How to Use a Water Manometer to Find the Chanter Reed’s Sweet Spot


A water manometer is an extremely useful tool that can help us to achieve several fundamental goals in piping, including blowing at the correct pressure for our chanter reed with calibrated drone reeds, and with steady blowing. This article will focus only on the first goal, blowing at the correct pressure. Subsequent articles will cover the other two topics.
A water manometer is s simple device that consists of clear plastic tubing that is bent back on itself so that it can contain water in one section of the tubing. When one of the free ends of that tubing is attached to the top of a drone, the air pressure inside the pipe bag is transmitted through the tubing and forces the water in the tubing to rise. This rise in water level indicates the relative pressure of the air inside the bag. A typical example of a water manometer is shown in the photo.
Keep in mind that a water manometer can be used only after the bagpipes has undergone a thorough check for superb maintenance. The pipe bag and all the joints must be absolutely air-tight, the reeds must be firmly in their reed seats, the stocks must be tight in the bag, and the blow-stick flapper valve must be seated tightly and working properly.
Some pipers use an analog pressure gauge, but a water manometer is preferable because it lends itself more readily to “marking” different positions on the tubing, along with being very sensitive to pressure changes.
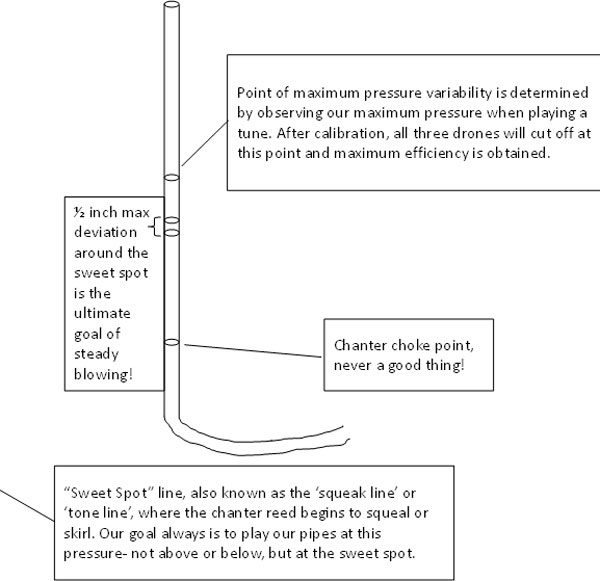
The key points on a water manometer are shown in the Figure.
The lowest point is where the air pressure is so low that the chanter reed stops vibrating, the so-called “choke” point. The “sweet spot” indicates that pressure where the chanter reed produces the maximum number of harmonics, or overtones, but without unwanted sounds such as squeaking or squawking. The line above the sweet spot is the point of maximum deviation when learning to blow steadily and where the drone reeds should be calibrated to shut off. This topic will be thoroughly discussed in a forthcoming article.
Every chanter reed is unique, even from the same manufacturer. Some reeds are easier or harder than others, but regardless of the reed’s strength, each reed requires a particularly unique pressure to maximize its harmonics and richness of tone. The chanter reed is most vibrant and lively when the greatest amount of air (energy) is moving through the reed without causing unpredictable sounds. Thus, the more air, the better the vibrancy and harmonics of the reed. We see this phenomenon all the time, even with a practice chanter, where if we barely blow, the resulting sound is terrible. But with increased pressure, the sound gets better. The same thing happens with a chanter reed, but of course the required pressure is far greater than that for a practice chanter. So, the chanter reed sounds best at its sweet spot, where the reed is taking a maximum amount of air without misbehaving. Thus, every reed has an ideal pressure at which it should be blown, and that is the pressure we should strive for when we blow (and squeeze!). Insert the free end of the manometer into the top of either tenor drone, making a snug fit. Some suggest that before attaching the manometer the reed should be removed from that drone and any canister inside the bag should be removed. Anything that might dampen or mitigate airflow from the inside of the bag out to the manometer has to potential to alter readings of the relative air pressure.
With the manometer attached to a drone top, strike in the pipes. Observe that the water level increases due to the increased pressure inside the bag. While playing a bottom hand note, such as Low G, begin to play a series of G gracenotes on Low G. Be sure that the gracenotes are crisp, small and percussive. An abrupt pressure change inside the pipe chanter brought about by playing a G gracenote on the Low G puts a lot of stress on the chanter reed. Now, while playing a G gracenote on Low G, gradually increase the pressure in the bag. Observe the water rise. The more controlled and gradual the water level rises, the easier it will be to observe a change in the sound. Ultimately, as the pressure continues to increase, the reed will become unstable to the point that it will squeak or give an unwanted sound when the gracenote is played. Carefully observe where the water level is when that phenomenon occurs. That point is the chanter reed’s “sweet spot”. Play around that point by varying the pressure above and below that point to confirm that the sound changes there when the G gracenote is played. At the sweet spot, put a rubber band or zip tie around the tubing.
The amount of pressure required to reach the chanter reed’s sweet spot often is a surprise to many pipers. But the fact is that one has now determined the optimal pressure for that particular chanter reed. But remember, the goal is to play at the same pressure, at the sweet spot, throughout the entire cycles of blowing and squeezing.
Now that the sweet spot has been closely identified, a huge question about our piping has been answered. That is, at what pressure should I be playing all of the time? You now know. To be able to play at the sweet spot, producing great tone, is the first step in learning to become a steady blower. You will build up the necessary stamina to be able to play with what might be a significant increase in pressure, but as the stamina builds so does the ability to “hear” when the pressure falls away from the sweet spot. If, on the other hand, it is exceedingly difficult to get the pressure high enough to blow at the reed’s sweet spot, then consider a slightly easier reed.
In summary, a water manometer is a tool with several practical uses. In this article, its use in finding a chanter reed’s sweet spot has been highlighted. Blowing at the sweet spot is the first step along the way to achieve steady blowing and a great bagpipe sound.
Download the Steady Blowing "Trifecta" Free PDF Guide

Click Here to download a free PDF eBook teaching you the Steady Blowing "Trifecta."


I don't find a video demo of how to use the manometer. Can you assist?
How much liquid do you put in the manometer?
Where is the "extremely valuable pre-recorded lesson/demonstration", as stated in the dojo u's manometer instructions? The manometer is referenced a lot on this site, but the setup instructions are not found and/or are not concise. Please help!